
Guide
How to use Quillo
Everything you need to connect your tools, draft faster, and publish to Substack.
Prefer to read? The written steps below cover the same flow.
Getting started
Quillo is a Substack publishing studio. The typical first-run looks like this:
- 1Buy Quillo, then create your account with the same email you used at checkout.
- 2Connect your Substack publication and keep your session fresh.
- 3Add your own AI provider key (or write manually).
- 4Draft in the AI Composer, review in Drafts, then push to Substack.
Content Library — collect what you'll write about
The Library is where source material lands before it becomes a newsletter. Everything you add shows up in the Inbox tab, and you can move items on or delete them as you work through your list.
Paste a URL
Follow a blog (RSS)
Direct RSS feed
Chrome extension
WordPress site
Notes
Featured images: when a saved link, RSS item or WordPress post carries a featured image, Quillo stores that image URL with the item. If you draft from that link, the image can be used as the Substack cover image. Inline images inside the body are best-effort only — some sites block external access to their media, and Quillo doesn't re-host images.
Draft a newsletter and post it to Substack
This is the core loop: pick sources from your Library, write the draft (by hand or with AI), check the preview, then push it to Substack and publish or schedule it.
- 1Open the Composer from the Studio, or select items in your Library and send them to the Composer.
- 2Write it yourself, or describe the newsletter and let the AI draft it for you.
- 3Review the preview, edit the subject and body until it reads the way you want.
- 4Save the draft, then push it to Substack from Drafts.
- 5Publish immediately or schedule a send time — both from Quillo.
Writing with AI (optional)
AI is entirely optional — you can type the whole newsletter yourself. If you do use it, you bring your own provider key (see AI keys) and choose how it writes:
Modes
Length & tone
Your own voice
Sources & highlights
You can also select text inside the editor and use the inline AI assists to rewrite, tighten or expand just that part. AI output is a starting draft — always read it before you send.
Preview and edit
The Composer has a rich editor by default. Turn Rich editor off if you prefer writing raw markdown — you then get a rendered preview underneath so you can see how the post will read. Edit the subject line and body as much as you like before saving.
Push, publish or schedule
Open Drafts and use Push to Substack. The draft appears in your Substack dashboard, and you get an Open draft link to check it there. From the same row you can then Publish now, or Schedule a send time (and Unschedule if plans change).
Cover image: if the source link you drafted from has a featured image, Quillo attaches it as the post's cover image on Substack. If the source site blocks external access to that image, the post still goes through without a cover — you can add one in Substack.
The Chrome extension is required for reliable posting. Publishing uses your own Substack login session, and the extension is what keeps that session fresh in the background. Pasting the cookie by hand works for a short while, but it expires and publishing will start failing. Chrome and Chromium browsers (Edge, Brave, Arc) are the supported, tested path — other browsers can't be officially confirmed.
Embed a subscribe form on your site
Build a Substack subscribe form in the Studio, style it with a live preview, then paste the snippet on any web page — or use the WordPress shortcode if you have the Quillo plugin installed.
The short version: Studio → Embeds → New embed → Form → pick a template → set your publication URL → style it → choose how it appears → copy the snippet or shortcode. Everything you change updates in the live preview on the right.
Step 1 — Create the embed and pick a template
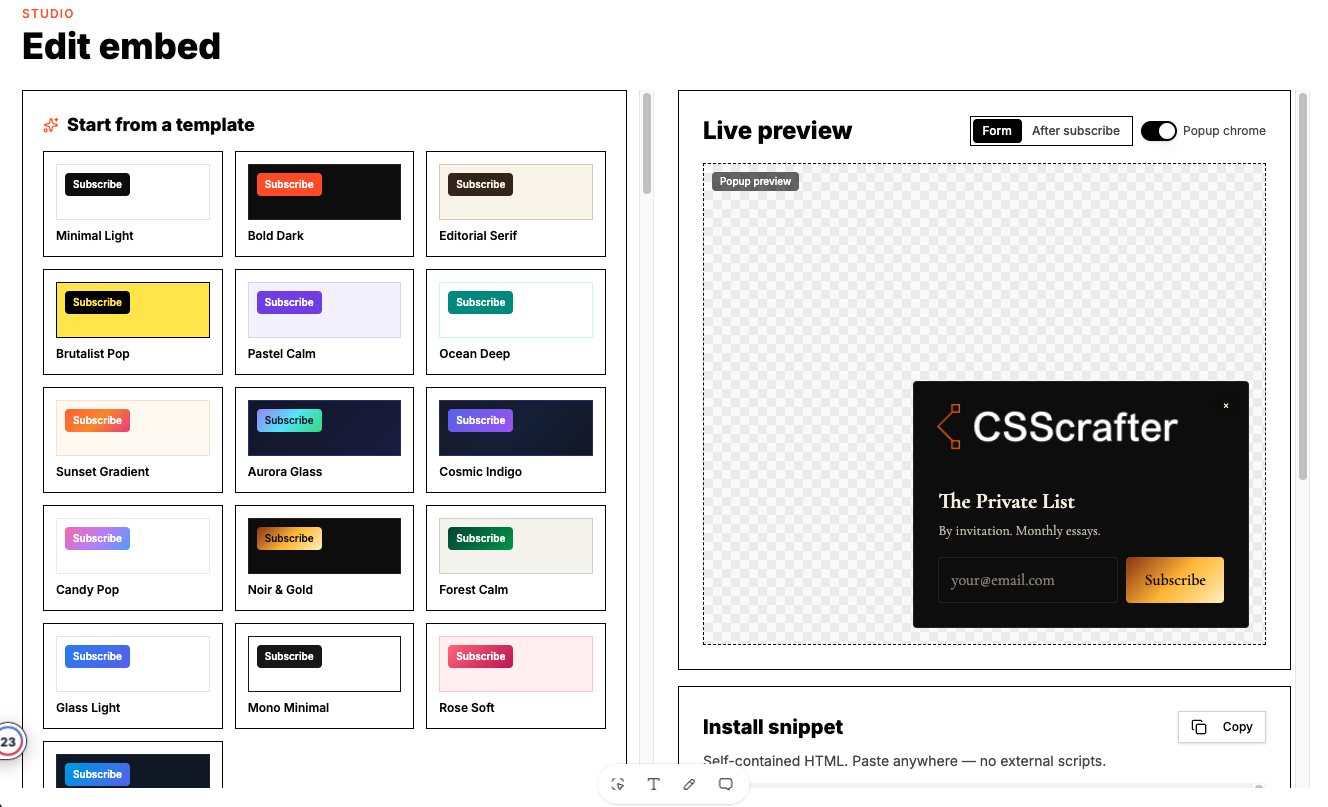
Open Studio → Embeds, create a new embed and choose Form. Start from one of the presets (Minimal Light, Bold Dark, Editorial Serif, Brutalist Pop, Aurora Glass, Noir & Gold, and more). A template just fills in colors, fonts and radius — you can change every value afterwards.
Step 2 — Basics
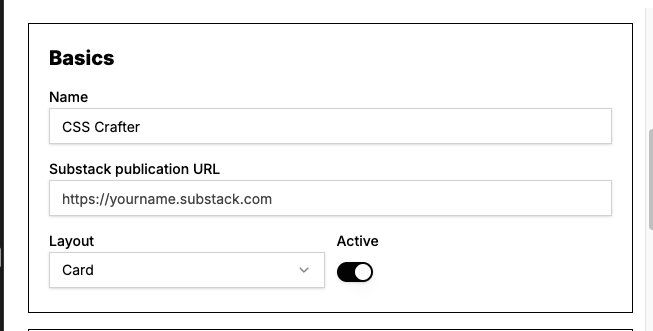
- Name — internal label so you can find this embed later.
- Substack publication URL — where subscribers are sent, e.g.
https://yourname.substack.com. - Layout — Inline, Card or Minimal.
- Active — turn this on to serve the form. An inactive embed stops rendering on your site.
Step 3 — Copy (the words people read)
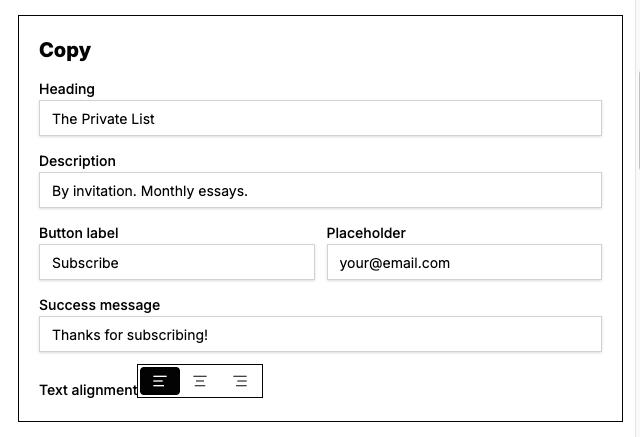
Set the heading, description, button label, email placeholder and the success message shown after someone subscribes. Pick the text alignment (left, center, right) with the three alignment buttons.
Step 4 — Typography, surface and button colors
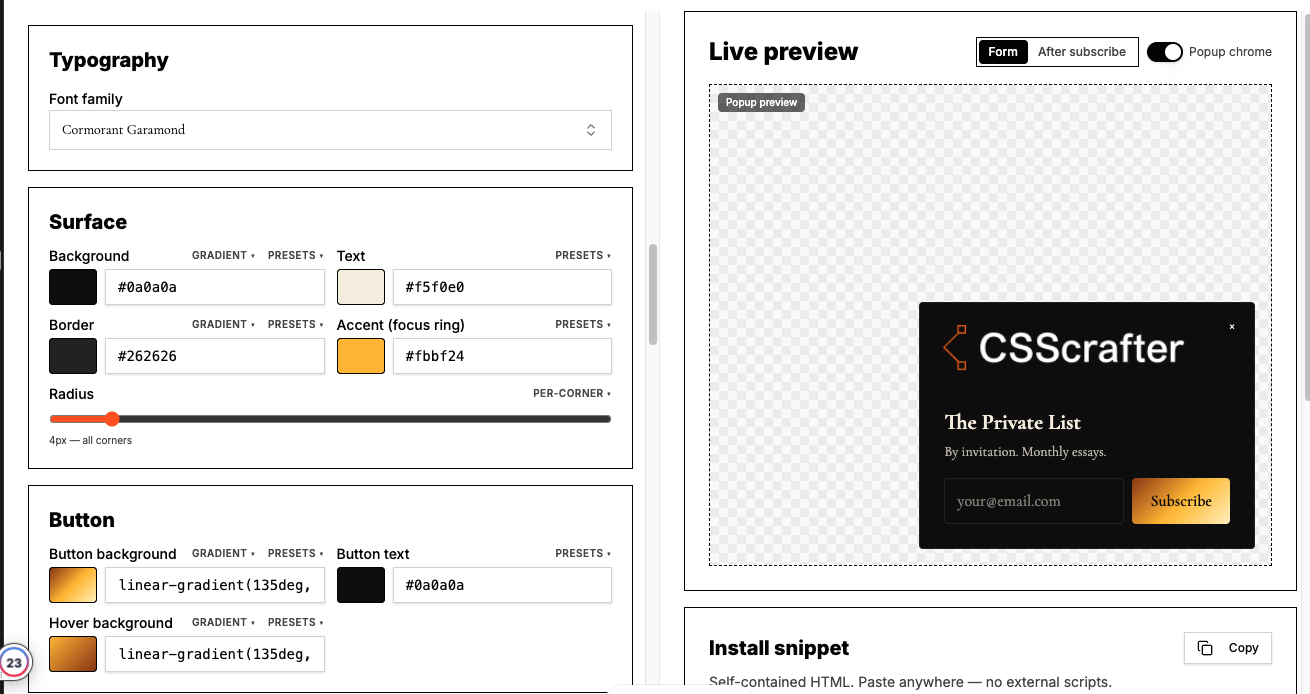
- Typography — choose the font family (system, sans, serif options such as Cormorant Garamond).
- Surface — background, text, border and accent (focus ring) colors, plus corner radius. Use Per-corner if you want different radii on each corner.
- Button — button background, button text and hover background.
- Each color field has Presets and, where it makes sense, Gradient helpers — so a background or button can be a CSS gradient, not just a flat hex.
Step 5 — How the form appears
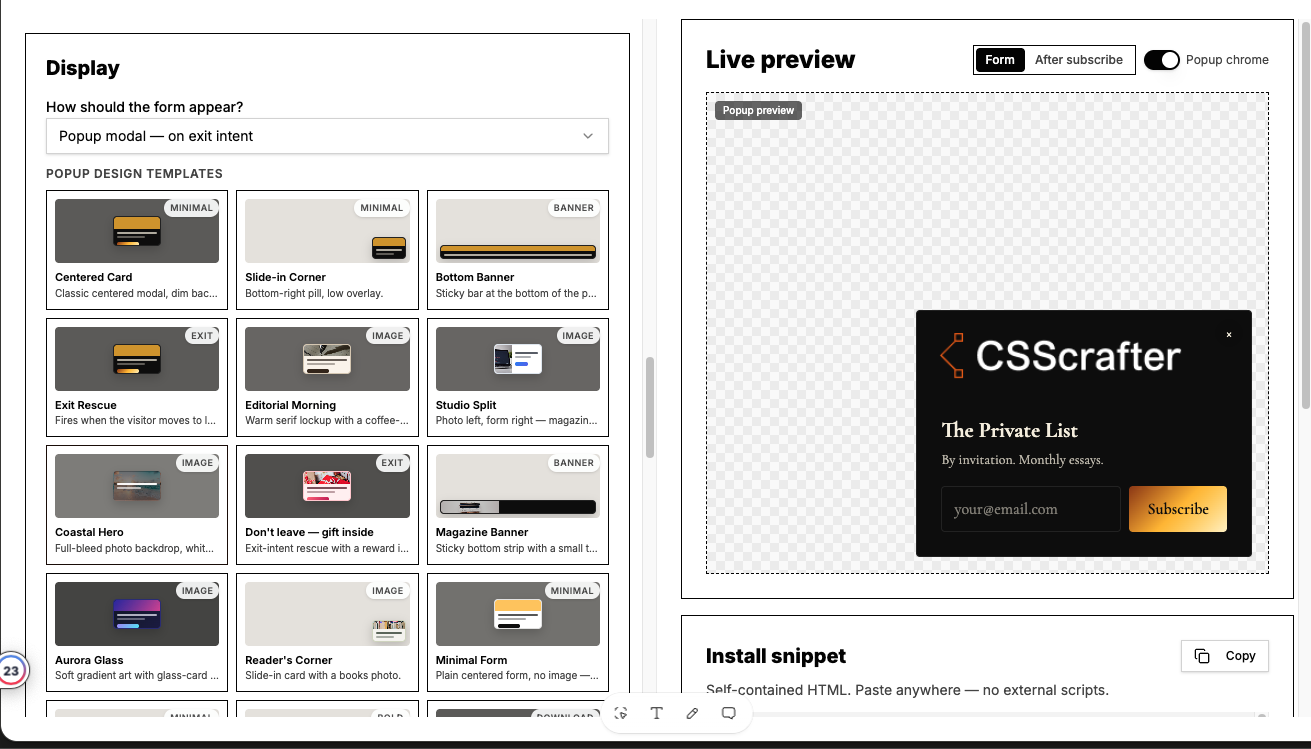
Under Display, choose one of four behaviours:
- Inline — sits in the page where you paste it.
- Inline after a delay — appears in place after a few seconds.
- Popup modal — timed — opens after your chosen delay.
- Popup modal — on exit intent — opens when the visitor moves to leave the page.
Pick a popup design template (Centered Card, Slide-in Corner, Bottom Banner, Exit Rescue, Editorial Morning, Studio Split, and more). Each template is a starting point; the options you get next depend on what you selected.
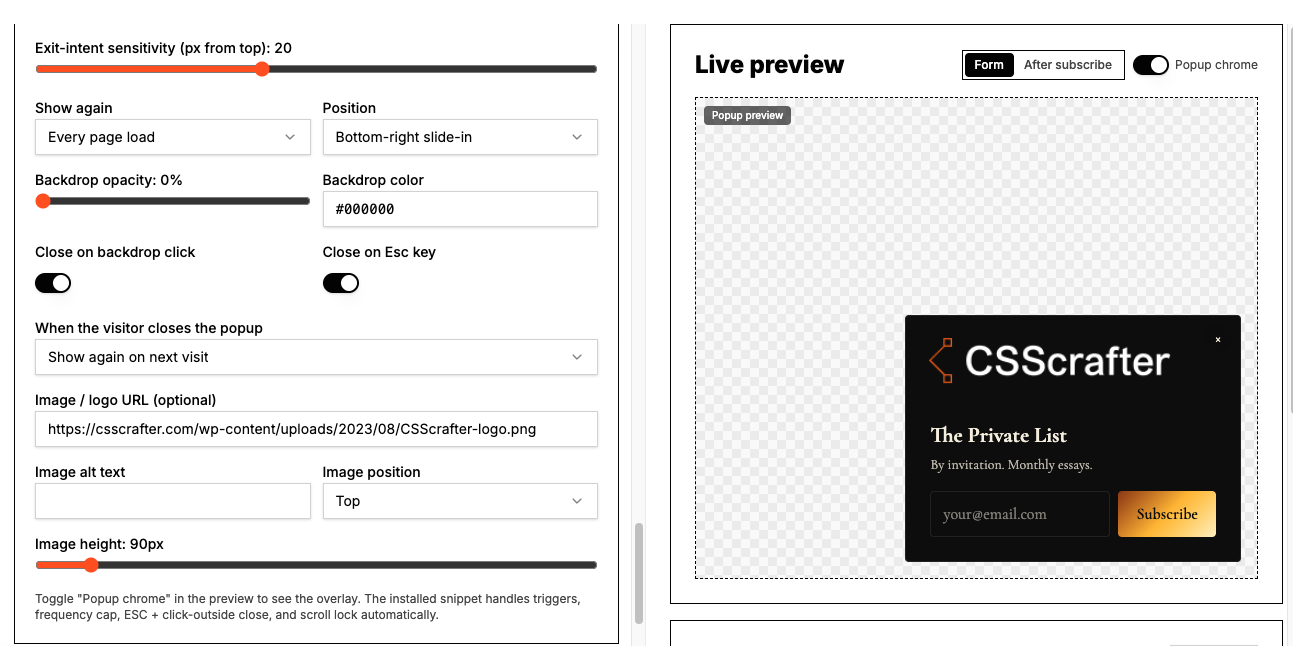
For popups you can then fine-tune: exit-intent sensitivity, how often it shows again, position (center, bottom-right slide-in, bottom banner), backdrop color and opacity, close on backdrop click, close on Esc, what happens after a visitor dismisses it, and an optional image or logo with alt text, position and size.
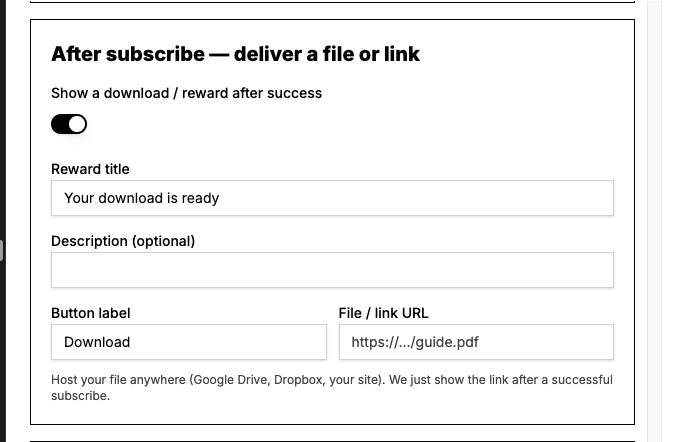
Step 6 — Lead magnet: deliver a file or link
Turn on Show a download / reward after success to build a lead-gen form: the visitor gives their email, gets subscribed to your Substack, and then sees your reward. Set the reward title, an optional description, the button label and the file or link URL.
Host the file wherever you like (Google Drive, Dropbox, your own site) — Quillo shows the link after a successful subscribe.
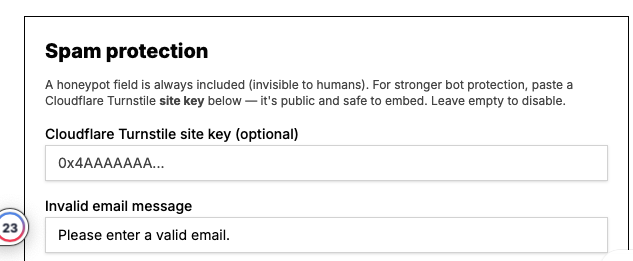
Step 7 — Spam protection
- A honeypot field is always included and invisible to humans — nothing to configure.
- Email validation is on by default; you can reword the invalid-email message.
- Optional: paste a Cloudflare Turnstile site key for stronger bot protection. The site key is public and safe to embed. Leave it empty to disable.
Step 8 — Install it on your site
Scroll to Install snippet and press Copy. It is self-contained HTML — no external scripts — so you can paste it into any page, template or block editor. You can also grab it any time from the embeds list with the Get code button.
Any website
WordPress with the Quillo plugin
[quillo_subscribe id="…"]. Copy it from Get code or the editor’s code panel.Want to show your latest Substack posts instead of a form? See Embed a newsfeed below.
Entries & form analytics
Every subscribe form keeps its own record of what happened: who signed up, whether the signup reached your newsletter, and how well the form converts. Open Studio → Embeds → your form and scroll to Entries & form analytics.
How a signup travels. When a reader submits, Quillo records the address on your form first, then delivers it to your newsletter from the reader's own browser — the same approach the most reliable embeds use, because it doesn't route every signup through one shared server address. If that can't complete, Quillo's own server delivers it as a second path. Either way the address is already yours.
Entries: view, retry, export
- Email, captured time and source page for every submission, newest first. One reader is always one row per form.
- Status — delivered means the signup was submitted to your newsletter, pending means it is captured and still being confirmed, failed means your newsletter rejected it (for example an invalid address).
- Retry re-sends any entry that is not delivered, from Quillo's server, with sensible spacing so a temporary block can clear.
- Export CSV downloads that form's entries so you can import them into your newsletter manually at any time — even during an outage on their side.
Form analytics: what each number means
- Views (30d) — one count per reader per day, no matter how many times they reload the page.
- Submissions (30d) — submits that passed the email check.
- Conversion — submissions ÷ views, as a percentage.
- Delivered / pending — the current delivery state of stored entries.
- This month's usage — how much of the monthly analytics allowance the form has used, with a warning once you pass 80%.
These come from your own forms only. Bot submissions caught by the honeypot, instant machine submits, throwaway inbox addresses, invalid addresses and repeat submissions by the same reader are not counted as new entries. Counting is generous but not unlimited: on a very high-traffic month a form can reach an analytics ceiling and stop counting for the rest of that month — the form itself keeps working and every signup is still delivered exactly as before.
Stored entries are kept for 12 months and then removed automatically, so old reader addresses do not sit in Quillo forever. Export a CSV any time you want your own copy. Storage is also capped at 50,000 stored entries per account; past that, new signups still deliver to your newsletter, they simply are not archived — so export regularly if you are anywhere near that number.
Turning entry storage on or off
Store entries for this form is a per-form switch. Turn it off for delivery-only behaviour: signups are still sent to your newsletter, they are just not kept in Quillo. Keeping entries is part of a paid Quillo plan, because stored reader addresses are data we hold on your behalf and keep access-controlled.
What happens if my plan ends
Your published forms keep working and keep subscribing readers — nothing on your site breaks. What stops is the studio: signing in with an ended plan takes you to Settings, so the Entries view, the builder and the rest of Quillo stay locked until you renew, and new signups are delivered but no longer stored. Nothing already saved is deleted — renewing brings it straight back. Export your entries to CSV before your plan ends if you want them in hand in the meantime.
Embed a newsfeed of your Substack posts
A newsfeed embed shows your latest Substack posts on your own site — styled to match your brand, with a live preview while you build it.
The short version: Studio → Embeds → New embed → Newsfeed → name + publication URL → Style → Posts → Layout → Behavior → Embed code. Same flow as the form, only the panels differ.
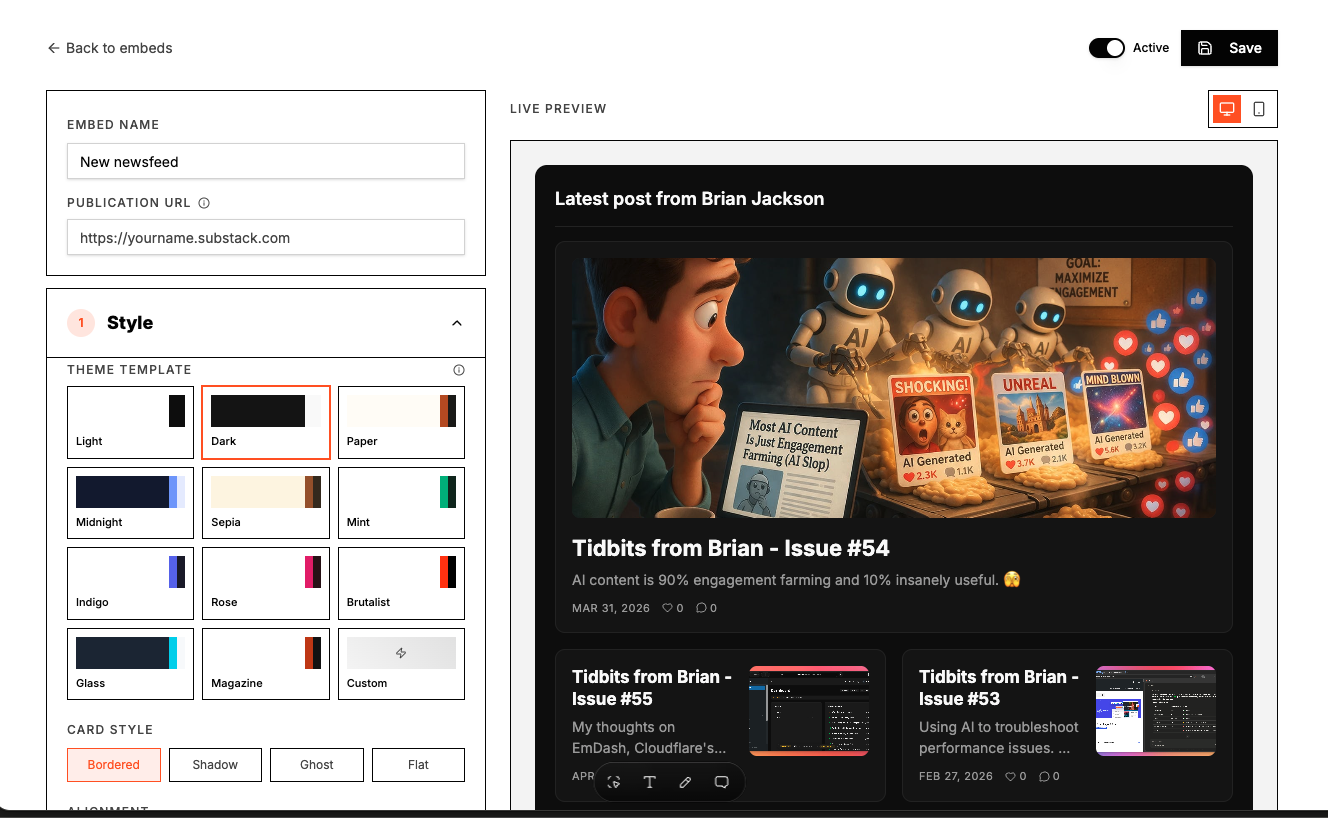
Step 1 — Name, publication URL and Style
- Embed name — internal label so you can find it later.
- Publication URL — e.g.
https://yourname.substack.com. Posts are fetched from here. - Theme template — Light, Dark, Paper, Midnight, Sepia, Mint, Indigo, Rose, Brutalist, Glass, Magazine, or Custom for your own colors, radius and font.
- Card style — Bordered, Shadow, Ghost or Flat.
- Alignment — left, center or right text.
- Fields to show — image, subtitle, author, premium badge, date, reactions and comments. An orange-marked toggle means that field is visible; the preview updates instantly, so you never have to guess.
- Use the desktop / mobile buttons above the preview to check both widths, and the Active switch + Save at the top right when you are done.
Step 2 — Posts: fetch, choose and reorder
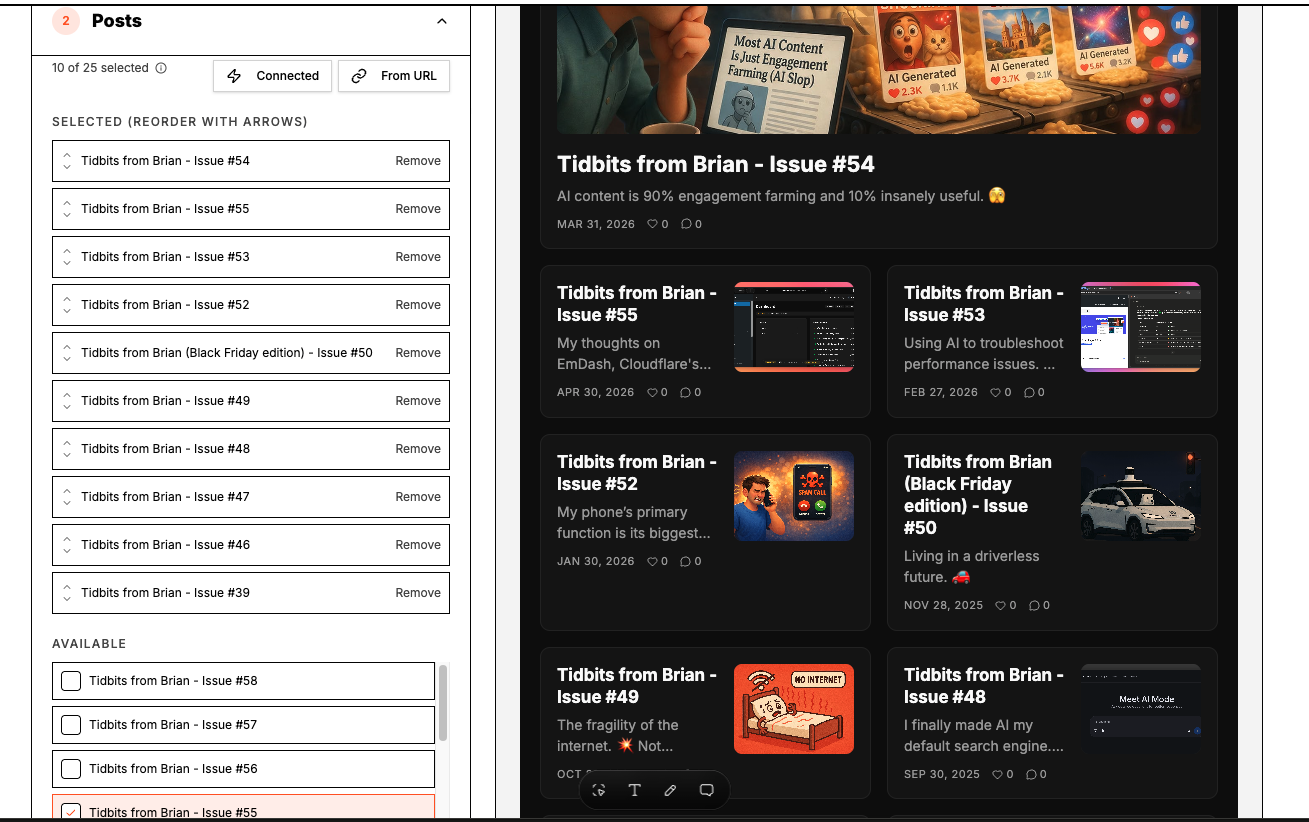
Open the Posts panel and pull posts in one of two ways:
- Connected — fetch from the Substack publication you connected in Quillo.
- From URL — fetch from the publication URL you typed above, no connection needed.
Tick posts in Available to add them, press Remove to take one out, and use the arrows in Selected to reorder — the first post becomes the hero in layouts that have one. Up to 25 posts can be selected.
Step 3 — Layout (5 styles)
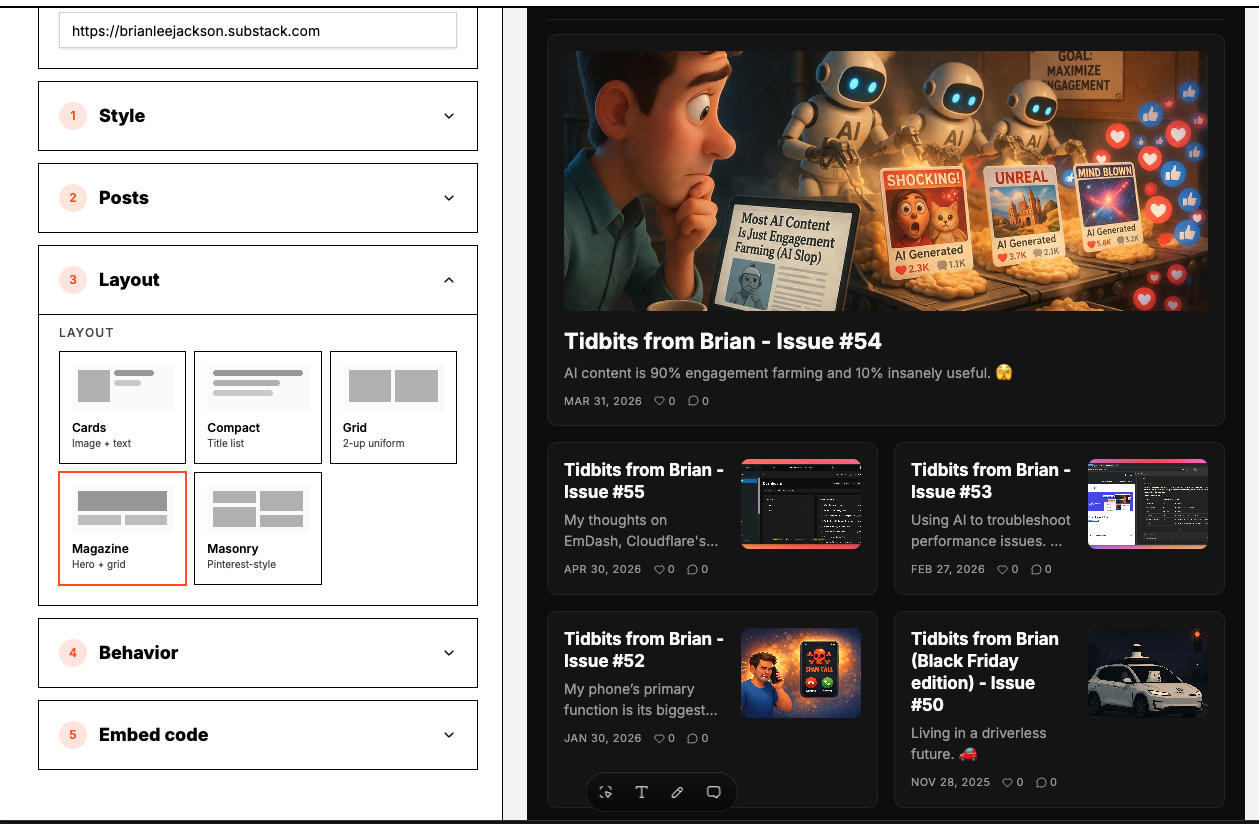
- Cards — image + text, one per row.
- Compact — a tight title list.
- Grid — 2-up, uniform tiles.
- Magazine — big hero post plus a grid.
- Masonry — Pinterest-style staggered columns.
Click through them and keep whichever reads best in the preview.
Step 4 — Behavior
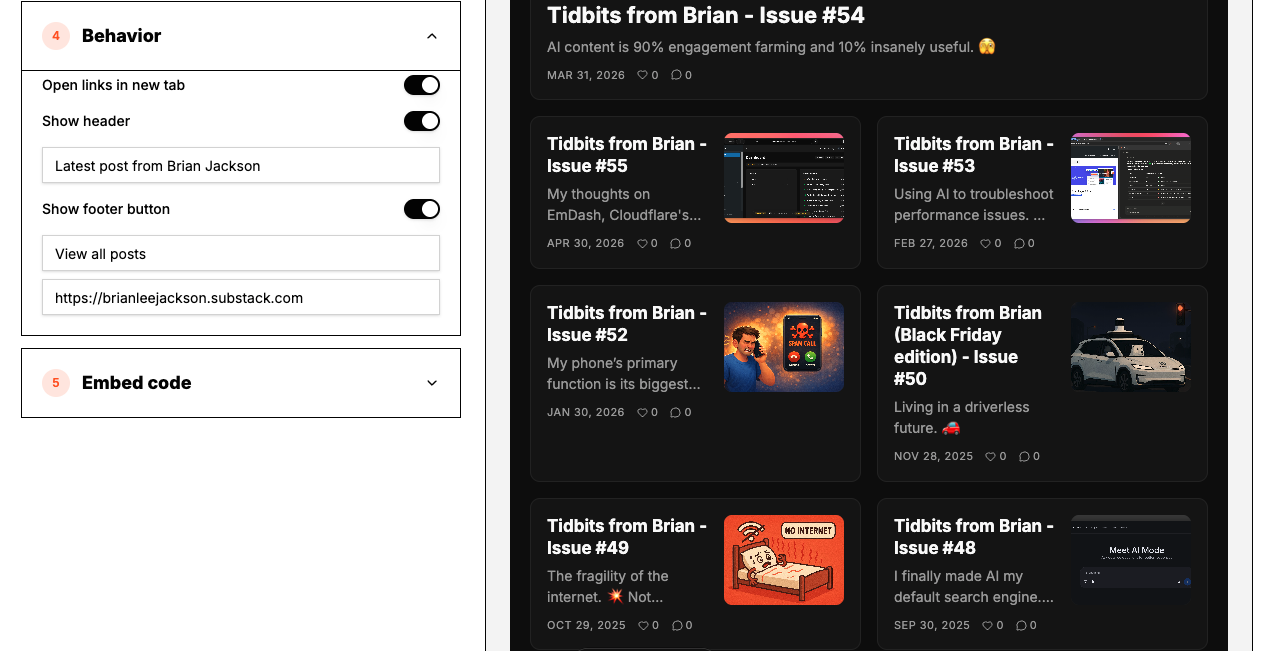
- Open links in new tab — keep visitors on your page.
- Show header — add a heading above the feed, e.g. “Latest posts from Brian Jackson”.
- Show footer button — a call-to-action such as “View all posts” pointing at your Substack URL.
Step 5 — Embed code
Open Embed code and pick whichever fits your site — you only need one.
Any website (HTML)
WordPress with the Quillo plugin
[quillo_newsfeed id="…"] instead of the snippet. Copy it with Copy shortcode, or from the Get code button in the embeds list.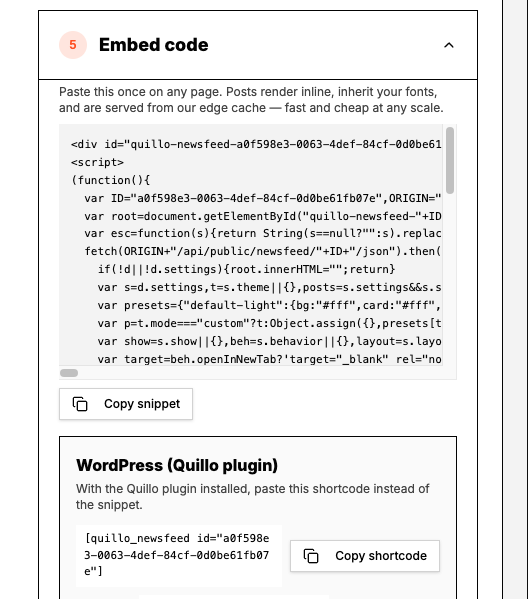
Change anything later and press Save — the live embed updates. No need to re-paste the snippet.
Connect Substack with the Chrome extension
Substack has no public publishing API, so Quillo publishes using your own Substack login session. The Chrome extension is what fetches that session and keeps it fresh — it is the recommended and supported way to connect. Follow the six steps below once and publishing keeps working.
Browser support — please read
- Supported and tested: Google Chrome and Chromium browsers (Edge, Brave, Arc, Opera). This is the only path we can guarantee.
- Other browsers (Firefox, Safari): there is no Quillo add-on. You can still connect manually by pasting your
substack.sidcookie, but that session expires whenever Substack rotates it and nothing refreshes it for you. That path is not guaranteed and Quillo takes no responsibility for it. - Without the extension you should expect repeated reconnects and occasional
429rate-limit errors on the first check.
- 1
Install the Quillo extension in Chrome
- Unzip the downloaded file into a folder you will keep (do not delete it).
- Open
chrome://extensionsin Chrome. - Turn on Developer mode (toggle, top right).
- Click Load unpacked and select the unzipped folder.
- Pin Quillo to the toolbar so the popup is one click away.
Chrome cannot auto-update an extension installed this way. The popup tells you when a newer version exists — download it again, unzip over the same folder, then click the reload icon on
chrome://extensions. Your saved token survives the update.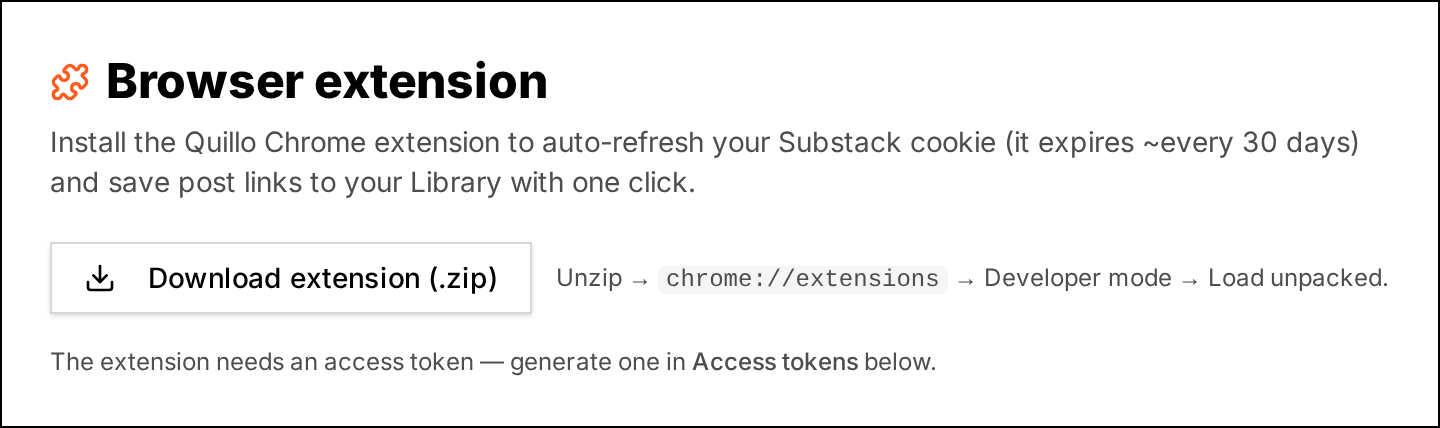
Settings → Browser extension. The download button and the install order are also shown here. - 2
Generate your Quillo access token
Open Settings → Access tokens, type a label such as Chrome extension, and click Generate token. Copy the token (it starts with
qext_) — it is shown in full only once. One token per device or site, so you can revoke a single one later.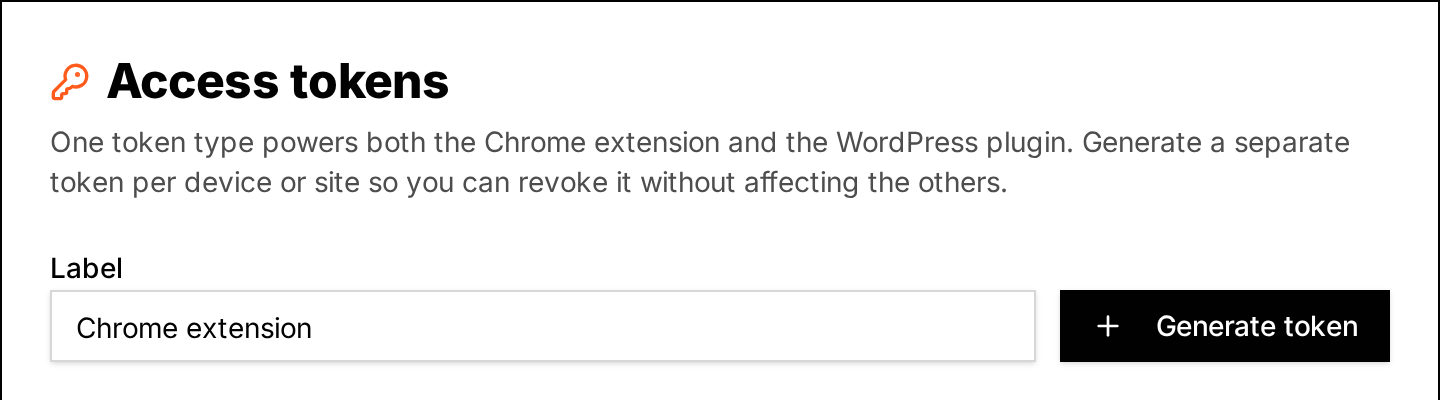
Settings → Access tokens — one token powers the Chrome extension and the WordPress plugin. - 3
Paste the token into the extension popup
Click the Quillo icon in the Chrome toolbar, paste the token into Quillo token, and click Save token. The popup confirms the token was stored.
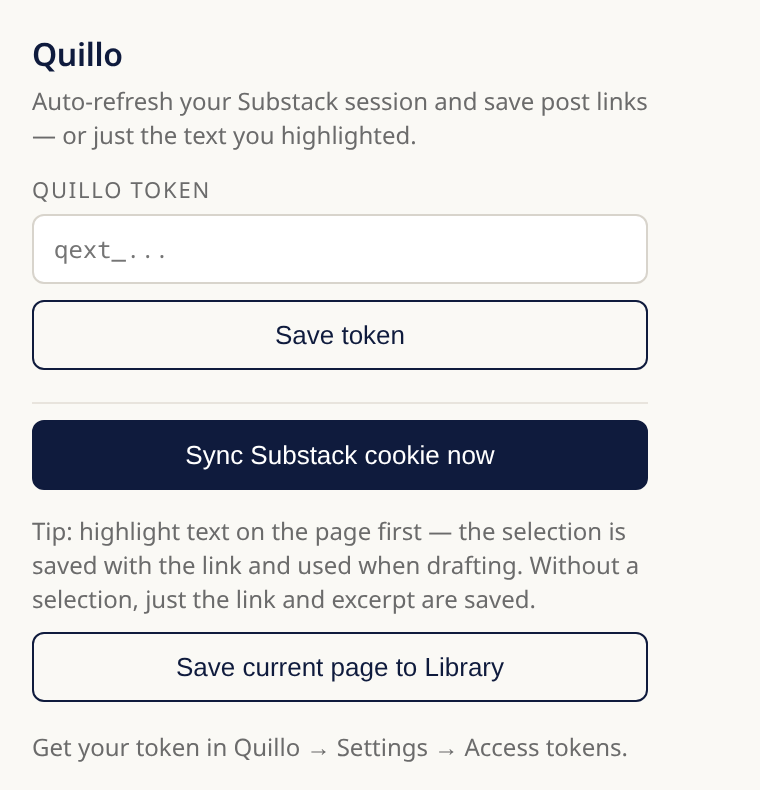
The extension popup: save your token, then use Sync Substack cookie now. - 4
Stay signed in to Substack in that same Chrome profile
Log in to substack.com in the same Chrome profile where the extension is installed. You do not need to keep a Substack tab open — the extension reads the session from Chrome itself. Just don't sign out of Substack in that profile.
- 5
Click “Sync Substack cookie now”
Open the popup and press Sync Substack cookie now. The extension sends your Substack session to Quillo and, on the first sync, Quillo can detect your publication automatically — so most people never type a publication URL or a cookie at all. After that the extension refreshes the session in the background on its own.
If the popup reports that no publication could be detected, add your publication URL once in Settings → Substack (for example
https://yourname.substack.com) and press sync again. - 6
Confirm in Settings, then publish
Back in Settings → Substack the setup checklist should read Ready to publish and the card should show Connected with your publication URL. If it hasn't caught up yet, press I've just synced — check now or Test connection. Then push a draft from Drafts.
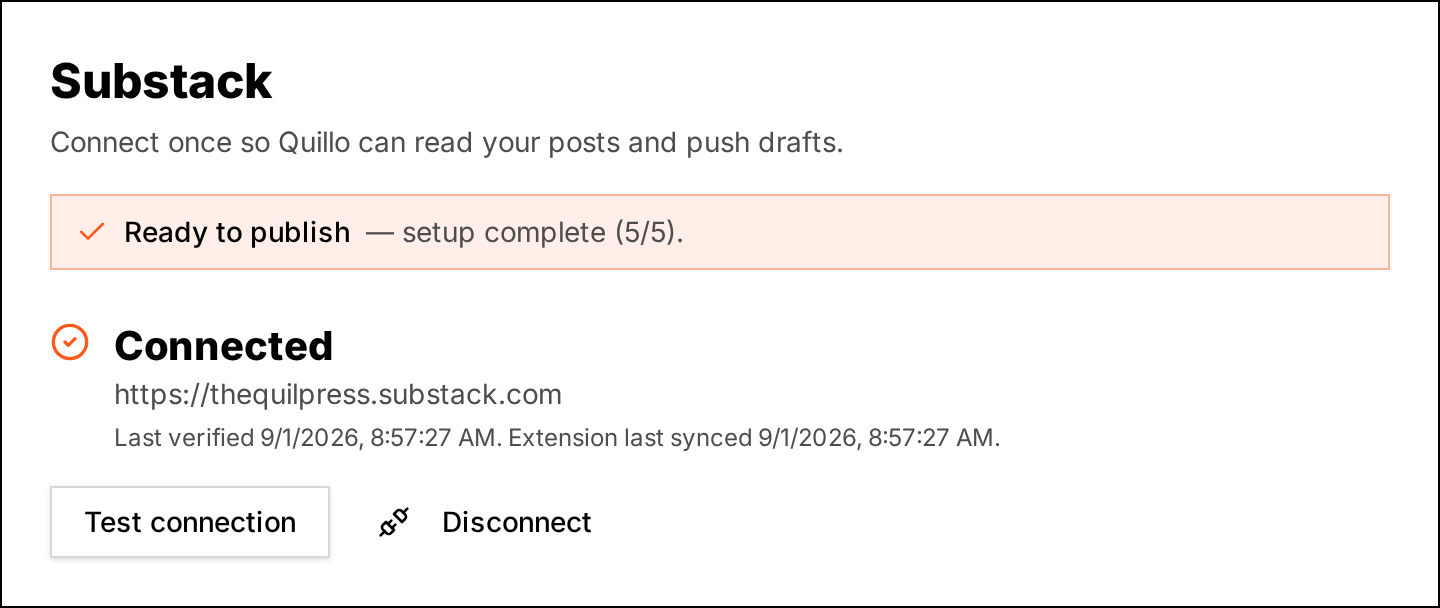
What a healthy connection looks like: Connected, plus the last verified and last extension sync times.
What else the extension does
- Auto-refreshes your Substack session so publishing does not fail mid-draft.
- One-click save of any article or page to your Library for later newsletter use.
- Need only part of a post? Highlight the passage on the page first, then click Save current page to Library. The selected text is saved as notes on that source (plain text, no layout or images), and the AI composer treats that passage as the part you cared about when it drafts from the link. Saving the same URL again with a new highlight replaces the notes.
Fallback for non-Chrome browsers: connect manually
Use this only if you cannot use Chrome or a Chromium browser. It works, but nothing refreshes the session for you: when Substack rotates the cookie, publishing stops until you paste a new one. This path is not guaranteed.
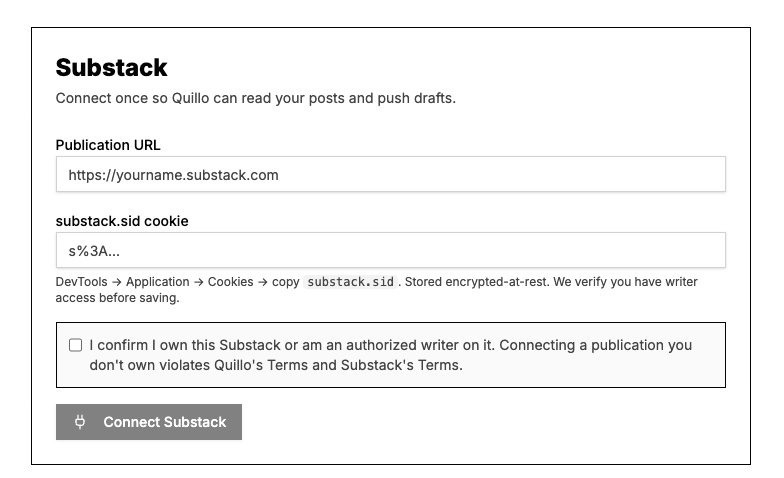
- Log into Substack in the same browser you use with Quillo.
- Open the Substack tab and press F12 on your keyboard, or right-click anywhere on the page and choose Inspect. This opens the developer tools.
- Open the Application tab (called Storage in Firefox).
- In the left sidebar, expand Cookies, then click
https://substack.com. - Find the row named
substack.sidand copy its value. - Go back to Quillo, open Settings → Substack, paste the value into the substack.sid cookie field, check the ownership box, and click Connect Substack.
- Repeat this whenever publishing reports that the session needs a refresh. There is no automatic refresh outside Chrome.
Important: rate limits
Substack may return 429: Too Many Requests if you connect or publish too quickly. Wait about 60 seconds and try again. This is not official Substack automation, so these natural limits apply.
Connection states & recovery
You never lose your place — Settings shows exactly which step is missing:
- Connected — pushing works. The health line shows when the session was last verified and when the extension last synced.
- Waiting for your Substack session — your publication URL is saved but no session has arrived yet. Open the Quillo extension, press Sync Substack cookie now, then press Test connection in Settings.
- Session needs a refresh — Substack stopped accepting the stored cookie (password change, logout, or normal rotation). Same fix: sync from the extension, or paste a fresh
substack.sidvalue. Your drafts are never affected.
If a 429 hits while you connect, use Save publication only. Quillo stores the URL and the extension finishes the handshake — no need to start over.
AI keys — bring your own key
Quillo does not bill you for AI usage. You add your own provider key and we call the provider directly. Keys are encrypted server-side.
Go to Settings → AI keys, choose a provider, paste the key, then pick a model in the Composer.
| Provider | Official key page |
|---|---|
| OpenAI | platform.openai.com/api-keys |
| Anthropic (Claude) | console.anthropic.com/settings/keys |
| Google (Gemini) | aistudio.google.com/apikey |
| Mistral | console.mistral.ai/api-keys |
| DeepSeek | platform.deepseek.com/api_keys |
| OpenRouter | openrouter.ai/keys |
WordPress plugin
The plugin pulls your WordPress posts into Quillo. You then edit and publish them from Quillo — there is no direct posting from WordPress to Substack.
How the flow works
WordPress post → pulled into Quillo (Library / Drafts) → you review and edit in Quillo → you publish to Substack from Quillo. All publishing happens on the Quillo site.
Step 1 — Install the plugin
- Download
quillo-wp.zip. - In your WordPress admin, go to Plugins → Add New → Upload Plugin.
- Choose the zip, click Install Now, then Activate.
Step 2 — Connect (recommended: one-click)
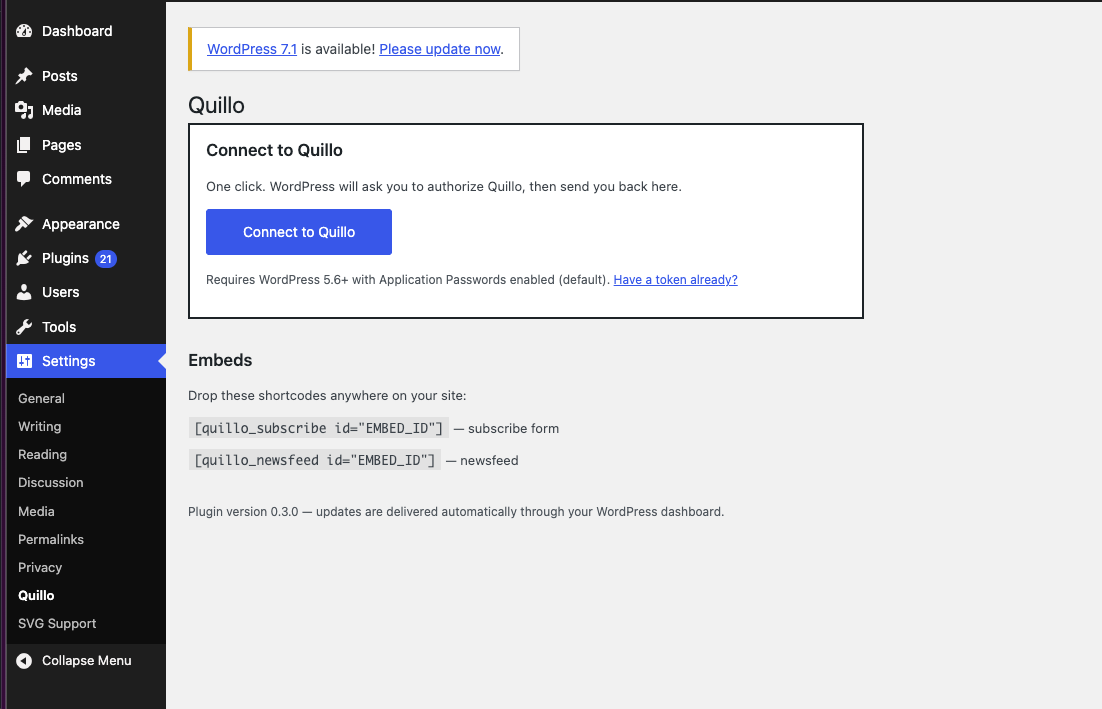
- In WordPress admin, open Settings → Quillo.
- Click Connect to Quillo. WordPress creates an application password for Quillo automatically.
- WordPress asks you to authorise the connection — approve it.
- You are redirected back to Quillo, where you click Allow to finish linking the site.
- Your site now appears in WordPress → Your posts.
If you land on “Your site is connected to Quillo”
Some hosts strip the return address WordPress sends us, so we can't hand the token back automatically. Your site is already connected — do not start over. Click Copy & open WordPress settings (this copies the token to your clipboard; it does not install it), then in WordPress under Settings → Quillo paste it into Replace token if the page shows a token error, or under Have a token already? if the site isn't connected yet, and save. WordPress checks the token with Quillo before storing it, then the card turns green with your plan and last sync.
Issuing a token always replaces the previous one for that site, so a stale token can never linger in Quillo — plugin 0.4.6 or newer is needed for the Replace token box.
Requires WordPress 5.6+ with Application Passwords enabled (default) and HTTPS.
Step 2 (alternative) — Connect manually
Use this if the one-click flow is blocked by your host or security plugin.
- In Quillo, open Settings → Browser extension and generate a token, then copy it.
- In WordPress, go to Settings → Quillo, click Have a token already?, paste the token and click Connect.
- In WordPress, go to Users → Profile of a user with the Administrator role, scroll to Application Passwords, create one named “Quillo”, and copy the generated password.
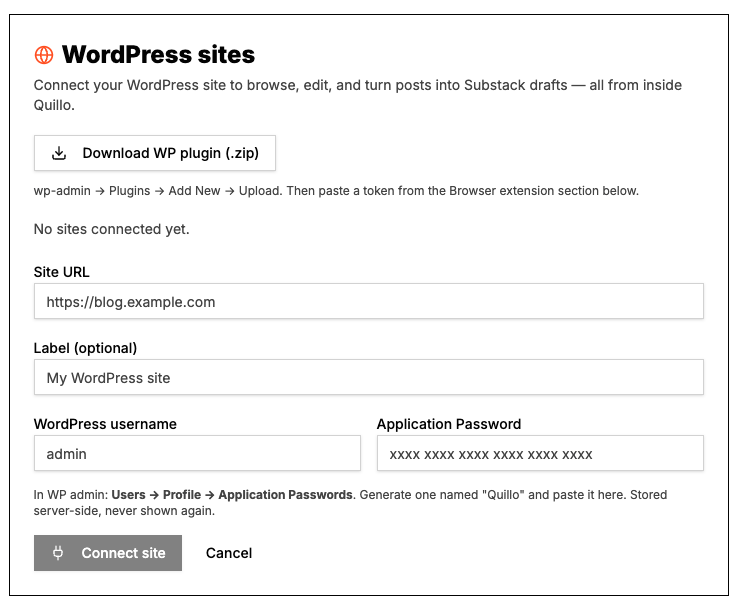
- Back in Quillo, open Settings → WordPress sites and fill in the Site URL, an optional label, the WordPress username and that Application Password, then click Connect site.
Step 3 — Pull posts into Quillo
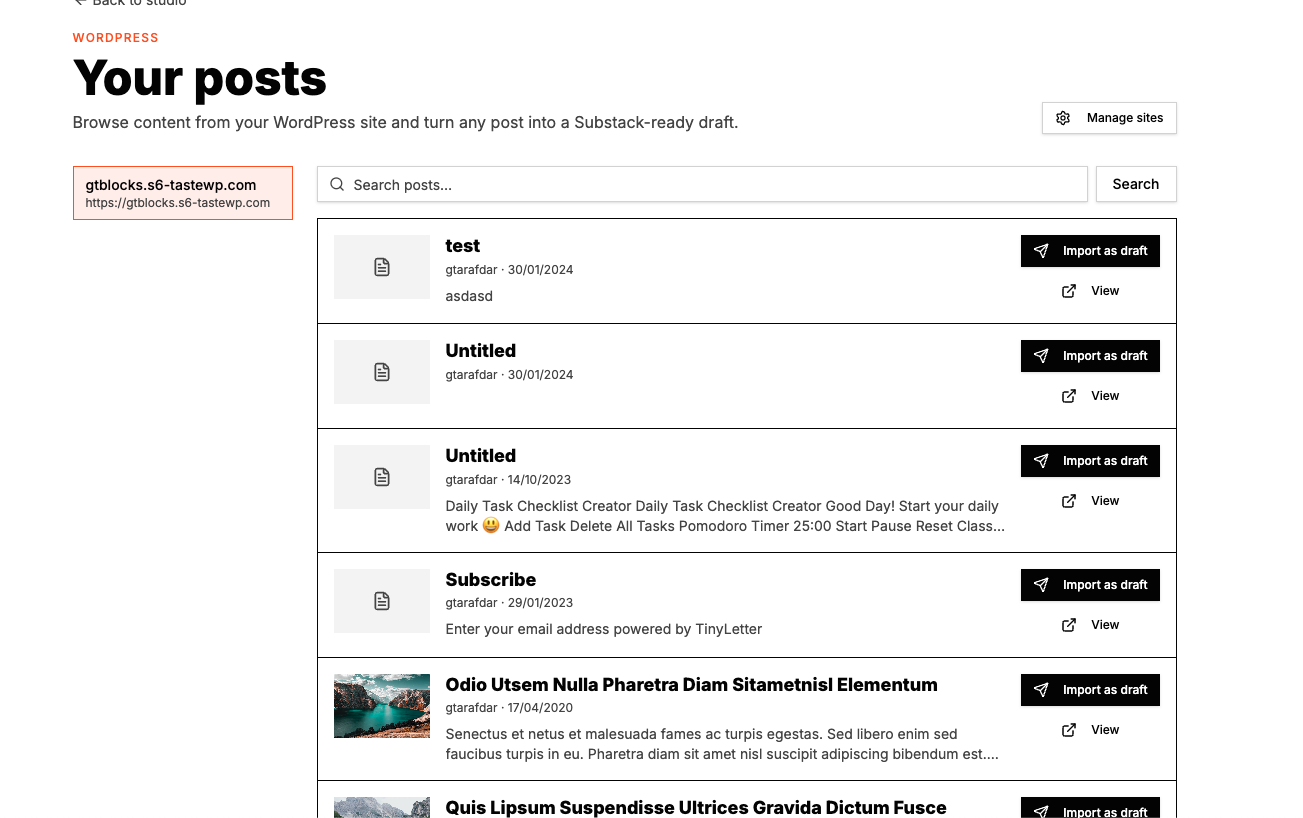
- Open WordPress → Your posts and pick your site in the left column.
- Search if you have many posts.
- Click Import as draft to pull a post into Quillo — one by one, or as many as you like.
- Use View to open the original post on your site first if you want to check it.
Step 4 — Edit and publish from Quillo
- Imported posts land in Drafts. Edit them there, or refine with the AI Composer.
- Publish to Substack from Quillo when the draft is ready.
- Wait about 60 seconds between posts to avoid Substack’s
429: Too Many Requestslimit.
Images: when a WordPress post has a featured image, Quillo uploads it to Substack and sets it as the post’s cover image, so it shows up in the draft and the email. If an image cannot be transferred (some sites block outside access), Quillo says so after the push and leaves it as a link you can replace.
Note: WordPress never posts to Substack directly. It only sends content into Quillo, and Quillo handles all Substack publishing.
Step 5 — Auto-send new posts (optional)
The plugin can push each newly published post into your Quillo Library automatically, so nothing has to be sent by hand. For older posts, import them from Quillo → WordPress (Step 3) — that path always carries the featured image.
- In WordPress, open Settings → Quillo and tick Automatically send newly published posts to Quillo.
- Optionally list extra post types (comma separated). The default is
post. - Publish something. It appears in your Library within a few seconds, and the last five sends are listed on the settings page.
Only newly published, public posts are sent. Old posts are not backfilled, edits are not re-sent, and a failed send never affects your published post.
Shortcodes — embed your forms and newsfeed
With the plugin active you can drop a Quillo embed anywhere on your site:
[quillo_subscribe id="EMBED_ID"]— subscribe form[quillo_newsfeed id="EMBED_ID"]— newsfeed- Optional attributes:
height(px) andclass.
Use the bare embed ID, not the element id
The ID looks like a0f598e3-0063-4def-84cf-0d0be61fb07e. Do not paste the quillo-newsfeed-… element id from the JavaScript snippet — the plugin now strips that prefix, but older versions rendered an empty frame.
Where to find it: every row in Embeds has a Copy shortcode button, the embed editors show a WordPress block with the ID and shortcode, and once connected the plugin's own Settings → Quillo page lists every embed with a click-to-copy shortcode.
Link-in-bio Pages
No website? Build one shareable page at thequillo.com/p/your-handle and put it in your social bios. It reuses what you already built in Quillo: your subscribe form and your newsfeed. Nothing new to design, nothing to host.
Step 1 — Create the page and pick your URL
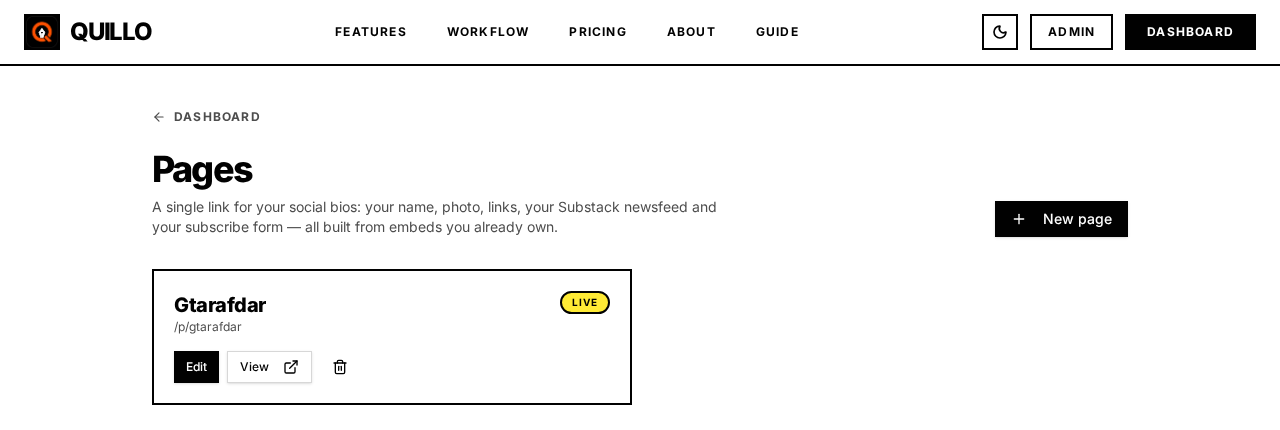
- Open Pages and click New page.
- Type the URL you want (for example
jane-doe). Quillo checks it live. If it's taken or reserved you're told immediately and offered three alternatives you can click. - The page starts as a draft — nobody can see it until you switch Published on.
Start from a template
You don't have to build a page block by block. When you create a page, pick one of the templates under Start from a template — Blank (the classic default), Signup First, Editorial, Profile Card, Midnight, Newsfeed Showcase or Growth Hero (serif headline with a red call to action and a social-proof line). Each one sets the starting blocks plus a matching theme: colours, corner radius, content width and heading, name and body text styling.
Already have a page? Open it and press Templates in the top bar, choose a look and press Apply template. Applying replaces the page's blocks and styling, but it keeps the subscribe form and newsfeed you already connected, and nothing is written until you press Save — so you can look at the preview first and simply reload the page to back out.
A template is only a starting point. Every control described below still applies on top of it, so you can change any colour, font size, alignment or block afterwards.
Step 2 — Add and rearrange blocks
A page is a stack of blocks. Add what you need, reorder with the arrows, hide a block temporarily with the eye icon, and preview everything live beside the editor. Use the phone and monitor buttons above the preview to check both widths — the page is responsive on its own, so the newsfeed drops to one column and cards stack on small screens without you configuring anything.
Under Style you can set the content width and open Heading / Subheading / Name / Body text to change size, weight, line height, letter spacing, case, underline, italic and colour. Every block also has a Block appearance panel for its own alignment, background, text colour, padding, border and corner radius — including the subscribe form and the newsfeed, whose alignment you can override for this page only. Leave any control untouched and it simply follows the theme.
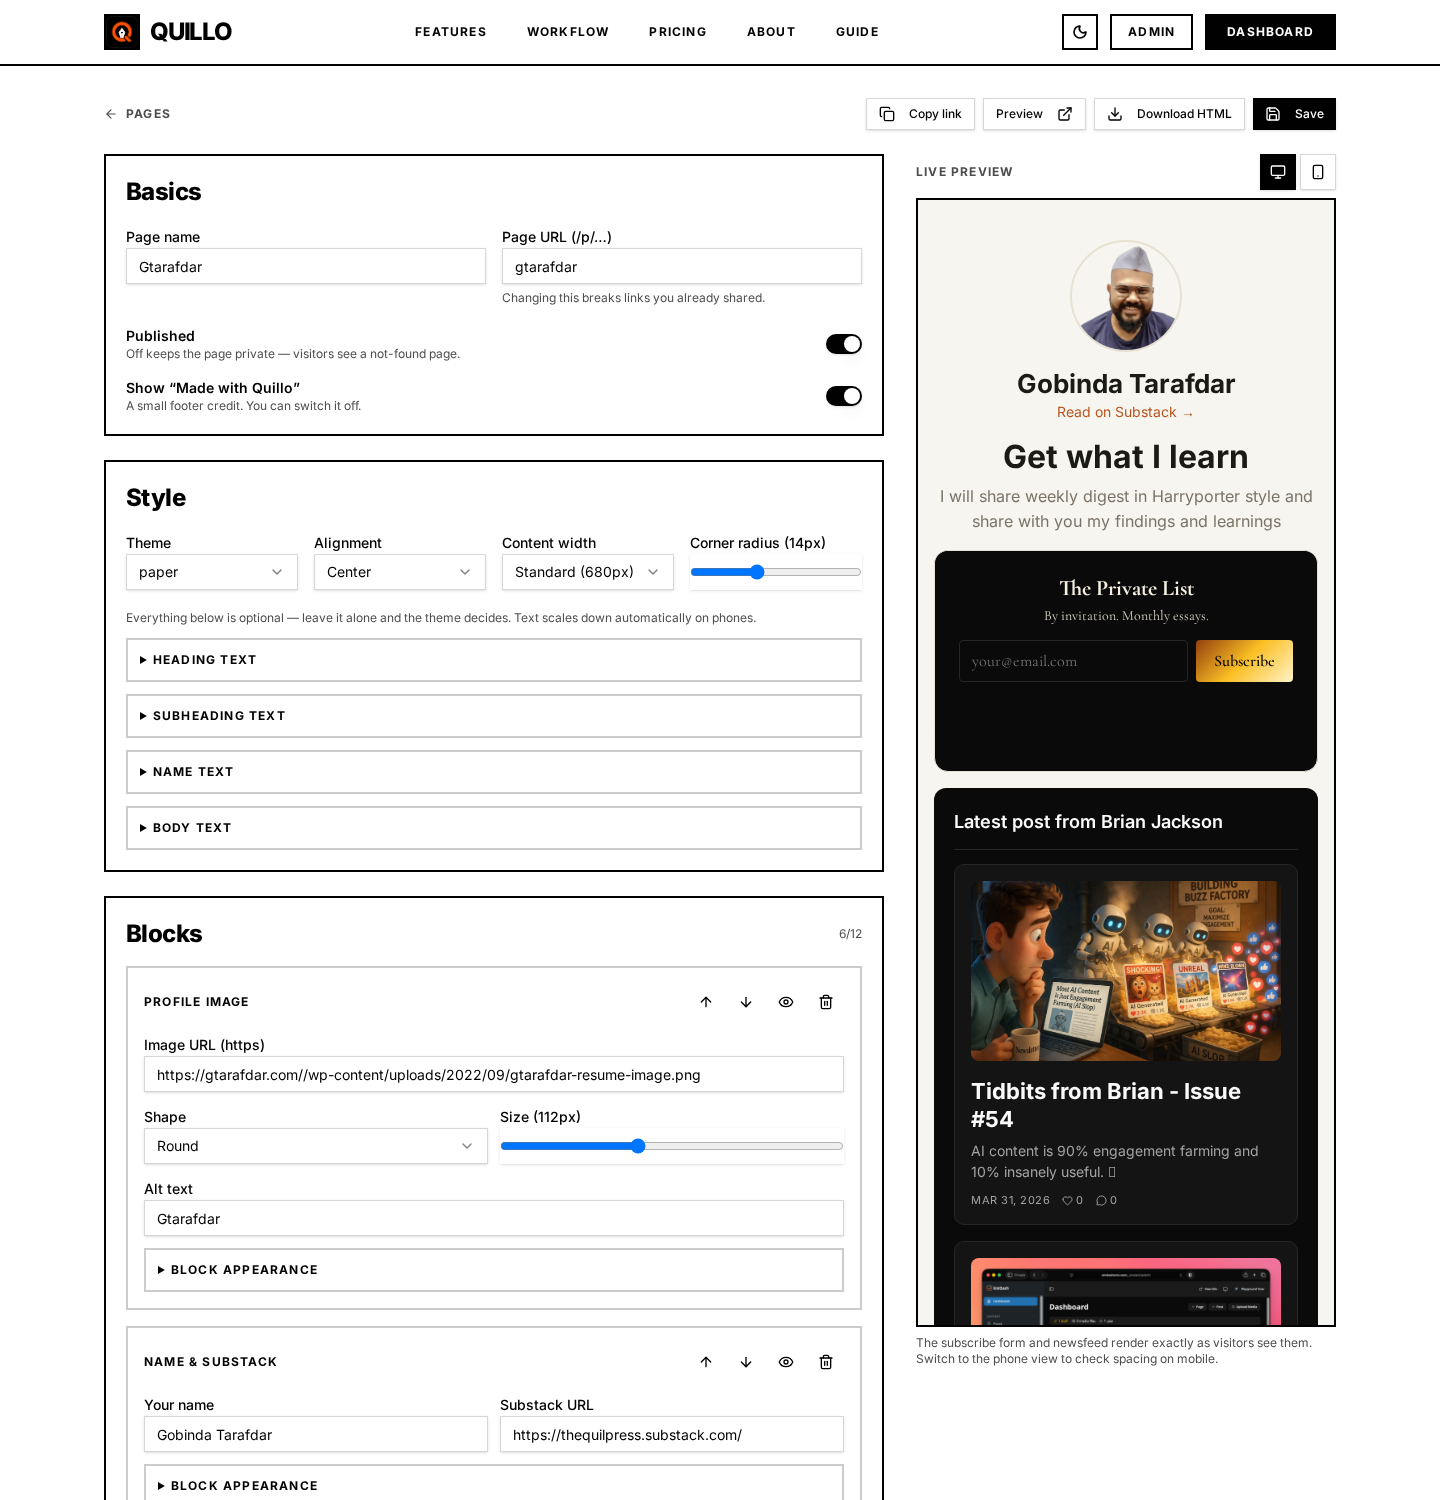
- Profile image — paste an
httpsimage URL (round or square). Quillo doesn't host images, so use your Substack avatar URL or any image you already have online. - Name & Substack — your name plus a “Read on Substack” link.
- Heading & subheading — your pitch in one line and one paragraph.
- Social links and button links — up to six buttons for anything else (podcast, shop, portfolio).
- Subscribe form — pick any active embed from Embed Studio. It's the same form, with the same spam protection and lead magnet.
- Newsfeed — pick any active newsfeed. It renders the posts you already selected, so the page never has to call Substack when a visitor loads it.
Step 3 — Publish and share
Turn on Published, hit Save, then use Copy link. That's the link for your Instagram, X, TikTok or LinkedIn bio. Change the URL later and the old link stops working — pick one you're happy with.
Allow search engines is on by default, so your page can be found on Google. Switch it off if you only want the page reachable by people you send the link to — the link keeps working exactly the same, it just asks search engines not to list it. Empty pages are never indexed.
The page carries your brand, not ours
The only Quillo mark is a small “Made with Quillo” line in the footer, and you can switch it off in the builder. A “Report this page” link always stays in the footer — that's how we keep public pages free of phishing and impersonation.
Own your page — download the HTML
Download HTML gives you one self-contained file: all styling is inline, and the subscribe form is the same standalone markup that posts straight to Substack. Put it on your own domain, any static host, or edit it by hand. No lock-in, and no Quillo account needed for the downloaded copy to work.
One honest caveat: the downloaded file is a snapshot. New Substack posts won't appear in the downloaded newsfeed until you export again — the hosted /p/ page updates whenever you refresh your newsfeed in Quillo.
Pages terms — what's allowed
Public pages are hosted on our domain, so a few rules are non-negotiable. Break them and the page is taken offline.
- No phishing or deception. Don't collect passwords, card numbers or other credentials, and don't imitate a login screen for any service.
- No impersonation. Don't present yourself as someone else's publication, brand or staff. Handles that impersonate Quillo or well-known services are reserved.
- No spam, malware or illegal content, and no adult or graphic material.
- Only your own content. You're responsible for the text, images and links on your page; images are hot-linked from wherever you host them.
- Moderation. Anyone can use the footer link to report a page. We review reports and may unpublish a page without notice. Unpublishing never deletes your content — you can keep editing or download the HTML.
Technical limits so pages stay fast and free of abuse: up to 5 pages per account, 12 blocks per page, 6 button links per block, and only http(s) links — scripts, custom HTML and embeds from other sites are not accepted.
FAQ
What Quillo is built for, what it supports, and the most common issues — answered honestly.
›What is Quillo for?
›Which images does Quillo transfer to Substack?
›Why didn't my WordPress featured image come through?
- The post has no featured image set in WordPress.
- The site blocks external access to its media (hotlink protection, a firewall, or CDN rules) — the image loads on the site itself but returns 403 to anything else, including Quillo and Substack.
- The image URL points to a temporary or expired host (common with demo/migration sites), so the URL is dead by the time it is used.
- The URL is not valid HTTPS, or a lazy-load plugin hides the real URL.
Quick check: open the image URL directly in a private/incognito window. If it doesn't load there, the source site is blocking it and Quillo can't fix that — re-upload the image on a stable host or re-import the post after fixing the URL.
›A signup shows as “pending” — is it lost?
›Why isn't an entry showing on Substack yet?
›Who can see my entries, and are reader emails protected?
›Do I have to store entries?
›What happens to my forms if my plan ends?
›Do snippets I pasted a while ago get the new reliability?
›Does any of this change how my form looks?
›What isn't counted in form analytics?
›Will applying a page template delete my content?
›Can I switch page templates later?
›Do templates change my embed or subscriber data?
›Why did my Substack connection stop working?
substack.sid cookie and paste it in Settings.›Which browsers does the extension support?
substack.sid cookie in Settings.›WordPress says my token is no longer valid — how do I fix the reconnect loop?
›Why do I sometimes see rate-limit (429) errors?
›Can Quillo import my entire archive into Substack?
Ready to publish?
Connect your tools in Settings, then open the Composer or your Drafts.